Translate

Saturday, October 20, 2018

Electric Motor Install 3.somethingsomethingsomething

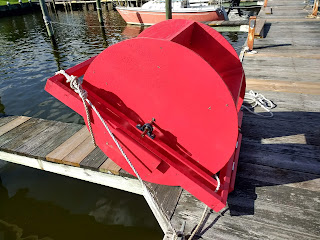
Finally a nice day and we managed to get some work done in getting the wheel ready to mount.
Everything you see that isn't red (yet) is carbon steel and has to be painted.

We used the nice weather to do the last of the touch up painting and to get some rust preventative paint (which mercifully matches the wheel) on all the steel parts that aren't stainless, those being the driveshaft, flanges, and pillow blocks.

We also got the motor mounted.  Here it is covered with plastic while we finish painting.

Here you can see the pillow block bearing, driveshaft, and connecting sleeve all painted.

The beast is now ready to install.
So today I'll install two strong eye-bolts to the wheelhouse frame for the support chains (we'll start with line until we're sure of the length) and then, hopefully (tide and wind cooperating) we'll get this puppy on and working over the weekend.

Wish us luck.

More shortly.....one hopes.

M

Monday, October 15, 2018

Of composting toilets and rain

No, we haven't forgotten about you.

We're still sitting here halfway through the paddlewheel installation, but every day this week it's either been raining, thinking about raining, threatening raining, just having rained, or too windy to get anything done.  Hopefully, after today, we'll have five or six days of decent weather and can make some progress.
Magellan is REALLY bored with all this rain.

It's life on a boat.  You deal with nature.  It's part of what we love about it, but it can get in the way sometimes.

In that regard:

I've noticed of late a LOT of interest in the Composting Toilet/Urine Diverter/Toilet build info posts.  I mean, rather a lot.  Would you guys be interested if we put together a little Ebook combining all the information we've learned from the start of the original Floating Empire on composting toilets and their care and . . .um. . .feeding?  We'd probably stick in on kindle or somesuchwhat for download.

Let me know in the comments if its a go.

More shortly, I promise.

M

Wednesday, October 10, 2018

Electric Motor Install 2. i forget

So, rather racing to get a bit ahead of hurricane-induced rainstorms and wind (shouldn't be too bad here, but we will get wet Thursday) we did manage to get the frame and the wheel mated and all the keys in their respective keyways.

Port side, with the platform for accessing the kayak.

Starboard side.  Motor mounts at center.
I have to admit, I was really pleased.  Gail and I picked up the wheel and frame and spun the wheel.  It just kept going and going.  So the bearings are good and we've obviously got them aligned properly with the shaft.

So tomorrow will likely be a waste. Friday we'll still have some winds but it's likely the rain will be done and we can do the last of our touchup painting, then, hopefully with some help, we'll try to get her on Saturday or Sunday.

If you're in the path of Michael, stay safe.  It's a big storm.

More shortly

M

Monday, October 8, 2018

Electric Motor Install Pt. 2.3.4

Okay, due to some really unpredictable weather, some minor health issues (okay, we broke a pair of glasses), and some general ennui, we've not exactly been surging ahead, but we have made some real progress in the installation of the wheel.

Okay, so I'm never happy with how fast these things go.....or realistic about how fast they CAN go.


Getting the driveshaft keyways aligned is a bit tricky.
We got the drive shaft in to align the flanges that connect it to the wheel.  It's a bit tricky as the keyways in the flanges and the keyway in the drive shaft all have to align, but we got it to work.  Hopefully when we go to put it all back together, I can do this without a sledgehammer.  FYI the driveshaft and flanges, like the motor shaft, are 7/8" steel with a 1/8" keyway.

The frame assembled and laid out with the driveshaft and pillow blocks.
We got the frame for the wheel assembled and fitted the pillow blocks and shaft to it.  You can see, it's not symmetrical.  The motor hangs off the starboard side of it (to your left in this picture.)  The larger framed space on the right will be a sort of swim platform to help get on and off the kayak.  It also will help counterbalance the weight of the motor.

Today, if the rain holds off, we'll get a bit of the last bits of painting done and get the whole thing assembled, looking for an installation tomorrow or the next day.

Weather and ennui permitting.

Stay Tuned.

M

Thursday, October 4, 2018

Electric Motor Install, Pt II, the Wheel

So yesterday we completed the paddlewheel (the test one, anyway).  The wheel is 3.5 feet in diameter and has six two foot buckets (paddles). 

Cutting the sides of the wheel.
The lumber bill at the moment looks like this:  One sheet of 3/4" exterior plywood, three 1" x 8" x 8' clear boards for the buckets, 3 treated 2" x 4" x 8's for the frame, and a piece of 2" x 2" x 8' for the blocks to support the buckets.

No, this is tragically not a lost Calder sculpture.  It's the blocks that will support the buckets (paddles)
Multiple coats of a good exterior paint starts the paint process.
aaaaaaand paint all over the damn place.
laying out a hexigon to align the buckets. 
So we used the quasi reliable radius method to lay out six equidistant points on each side rim and then struck a line connecting them to be able to mount the bucket supports evenly.

Blocks in place.  Note that each side must have the blocks on the opposite side of their alignment marks than the other.  I got paranoid about this, checked it five or six times, STILL got it wrong and had to remove and replace the blocks.  Take care.
Here is the beast assembled:


So today we will fit the drive shaft to the assembled wheel and begin assembling the frame that supports it.

Stay Tuned.

M

Wednesday, October 3, 2018

Keeping it Together

So, I've a lot of pictures and text and so forth on the new paddlewheel construction, which I'll post in a day or so, but--not at all based on anything I saw on the docks yesterday, mind you--this has been on my mind.

So, after thinking about this a bit, watching my slipmates, especially the newbies, deal with their boats and the water, I thought I would pass this along. Here are six, potentially disasterous things you can easily avoid on the water. Take them to heart and you'll be a lot less frustrated, I promise you.

First: The “Three Point Rule” is paramount. Whenever moving on, or getting off or on the boat, keep three points of contact at all times: two feet and a hand, two hands and a foot. . . avoid if at all possible stepping off the boat with both hands full. It's a formula for a fall. Boat decks can be slippery. Boats move, often suddenly and unexpectedly. Make sure you're ready and capable of coping with that if it happens.

Second: This is a boat, not a baseball field. Don't toss things unless there's no other option. In my time living aboard I've seen keys tossed from boat to dock (they missed, prompting an expensive locksmith visit and the even more expensive replacement of a wireless car key set), along with cell phones (they smashed) and a whole host of caps, floats, plates, tools, and assorted detritus, all of which either currently resides on the bottom below the docks or floated off downstream. HAND things off, and insist on the recipient saying “thank you” (an old Boy Scout trick) acknowledging they've got control of the item before you let go.

And in that regard: If you've got your cell phone, keys, etc. in your pocket or in your bag, you are unlikely to drop them off the dock. Wait until you hit dry land before you just HAVE to begin texting aunt Edna. I've seen some amazing juggling acts with keys and phones as people whip them out on the dock only to lose control of them.

Third: TURN OFF YOUR DOCK WATER WHEN YOU LEAVE!. I know of three boats now that sank, not because of leaks, but because the fresh water line from the dock was left on and a fitting broke aboard, filling the boat with water.

Fourth: Never, EVER wind a line around your hand when you're pulling it. You won't be able to let go quickly if you need to. I've seen hands smashed betwixt boat and dock because they were pulled down by the line they were holding and couldn't let go.  I actually learned this one working for years in the theatre, working in what's called a "hemp loft" stage. . . .ropes and sandbags.  I've seen more than one stagehand literally jerked off the ground because they couldn't let go of a line connected to waaaaaay too much counterweight.

Fifth: It's a boat. You're outside a lot. If you were camping, you'd wear sun block, bug spray, hats, sunglasses. . .all things to protect yourself from the elements. You need to do that on board. Reflection off the water can blast you with sunlight you aren't aware you're getting. Wind and salt can sap you of hydration, heat can do likewise. Pay attention to your body and what your surroundings are doing to it.

And Lastly: It's a boat. I know it doesn't happen often, but you can sink, you can fall overboard, hit your head, and drown. The ocean demands respect, and you forget that at your peril. Pay attention and you'll have a lovely time. Fail to and you may get an emergency room visit. . . .if you're lucky.

Nuff said.

M