This place is beginning to resemble Thailand in monsoon season.......
Actually when the rain broke we got lots done. Check back later...more pix tonight.
m
Wednesday, April 30, 2014
Tuesday, April 29, 2014
Galley Stuff
Well since it's raining I figured I'd attack the Galley. No that does not mean I raided the fridge...actually I did that too....
Food and cooking is a big thing to me. I've worked food industry, owned a restaurant, worked as a consultant to coffee firms and the like. The galley on Floating Empire was NOT going to be a two burner propane stove and an ice chest....okay maybe the ice chest.
Instead....being re enactors....we're building an 18 century hearth kitchen. If you'd like some great info on this, check out some of the youtube videos of Jas Townsend and Son. We got a lot of ideas from that wonderful company.
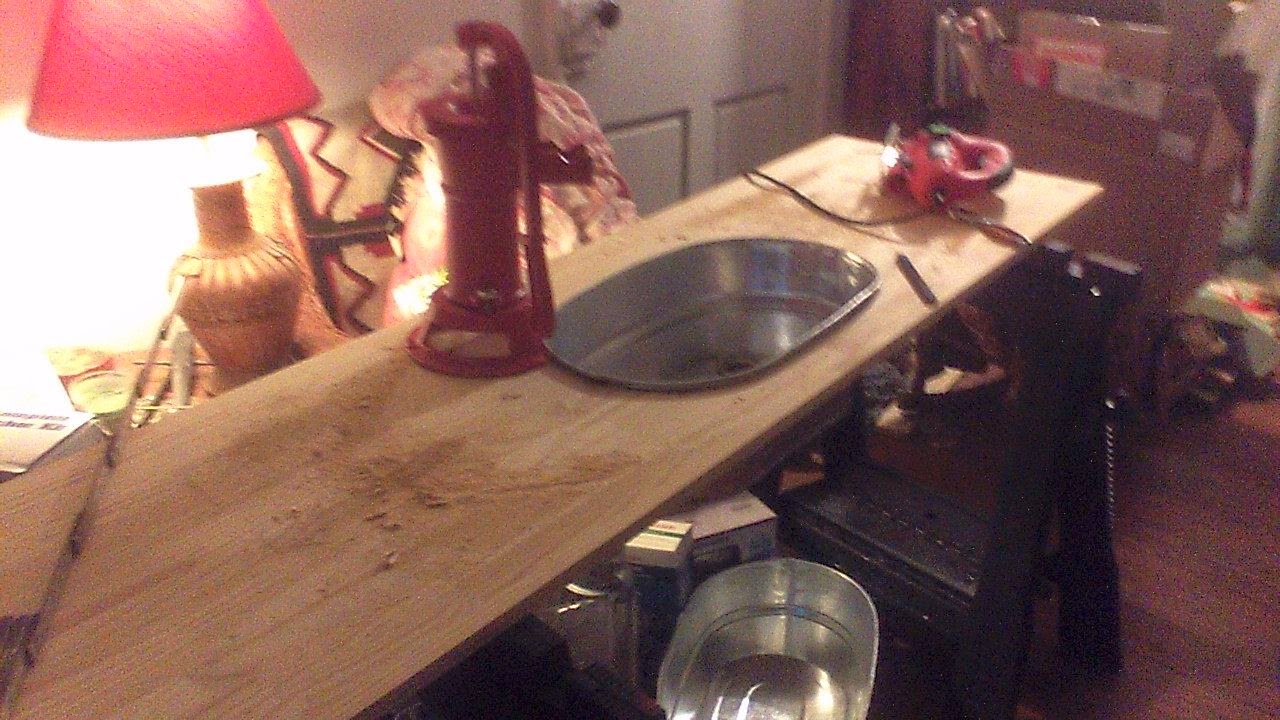
When we started buying stuff for the boat, we purchased a sink that was wwwAAAAAAAyyyy too large for the counter space we had. It took us a bit to realize that. Our main galley counter is 6' by 20", so most landlocked kitchen sinks are too wide. We looked at RV sinks (which would work) and using, as do many catering trailers, a 20" steam pan as a sink, but while wandering through the hardware store I came across these great galvanized oval tubs from Behrens. They're a tad over 12" wide by 20" long and a full 8" deep. Beside we loved the look. So I grabbed at couple (about $15 apiece).
Our Galley concept, given cooking styles, was to make ALL the counters cutting board. Everything is a prep surface, using premade glued pine panels for most. Sanded and oiled, they make great cutting surfaces.
So we started by cutting a hole in the tub for a bar sink drain. The drain is offset so the pipes can allow more storage room below. The GRAIN is because its kinda dark in here.

Please note, this is one freaking LOUD process. The whole tub is a sounding drum, and it's really easy to get off your line with a jigsaw. My phone went off three times while I was making this cut. Didn't hear a thing........not then and not for the next 17 minutes.....note to self: Ear Plugs.
Here's the drain inset.

I traced around the inverted tub on the countertop and cut a line about 1/4" inside that so that it would drop through and rest just below the lip. Please be aware, these things flex, and you'll probably have to cut off or pound flat the handles to make them fit.

I kept the cut out piece to make a cover for the sink. Here you can see the cut out in place in the insset tub while I drill the 1 1/4" hole for the galley pitcher pump.

And here's the rough sink and pump in place, sans caulking, oil, sanding...and, well, boat.
Heres a long shot to give you an idea of the size. Sorry about the quality...not much light in here.
So tomorrow I'll sand, bevel the edges a bit, oil the wood, and begin caulking stuff in place. Progress, even though indoors. Exciting, no?
More later
If you have any questions, please use the comments section below.
M
Food and cooking is a big thing to me. I've worked food industry, owned a restaurant, worked as a consultant to coffee firms and the like. The galley on Floating Empire was NOT going to be a two burner propane stove and an ice chest....okay maybe the ice chest.
Instead....being re enactors....we're building an 18 century hearth kitchen. If you'd like some great info on this, check out some of the youtube videos of Jas Townsend and Son. We got a lot of ideas from that wonderful company.
When we started buying stuff for the boat, we purchased a sink that was wwwAAAAAAAyyyy too large for the counter space we had. It took us a bit to realize that. Our main galley counter is 6' by 20", so most landlocked kitchen sinks are too wide. We looked at RV sinks (which would work) and using, as do many catering trailers, a 20" steam pan as a sink, but while wandering through the hardware store I came across these great galvanized oval tubs from Behrens. They're a tad over 12" wide by 20" long and a full 8" deep. Beside we loved the look. So I grabbed at couple (about $15 apiece).
Our Galley concept, given cooking styles, was to make ALL the counters cutting board. Everything is a prep surface, using premade glued pine panels for most. Sanded and oiled, they make great cutting surfaces.
So we started by cutting a hole in the tub for a bar sink drain. The drain is offset so the pipes can allow more storage room below. The GRAIN is because its kinda dark in here.
Please note, this is one freaking LOUD process. The whole tub is a sounding drum, and it's really easy to get off your line with a jigsaw. My phone went off three times while I was making this cut. Didn't hear a thing........not then and not for the next 17 minutes.....note to self: Ear Plugs.
Here's the drain inset.
I traced around the inverted tub on the countertop and cut a line about 1/4" inside that so that it would drop through and rest just below the lip. Please be aware, these things flex, and you'll probably have to cut off or pound flat the handles to make them fit.
I kept the cut out piece to make a cover for the sink. Here you can see the cut out in place in the insset tub while I drill the 1 1/4" hole for the galley pitcher pump.
And here's the rough sink and pump in place, sans caulking, oil, sanding...and, well, boat.
Heres a long shot to give you an idea of the size. Sorry about the quality...not much light in here.
So tomorrow I'll sand, bevel the edges a bit, oil the wood, and begin caulking stuff in place. Progress, even though indoors. Exciting, no?
More later
If you have any questions, please use the comments section below.
M
KINGPOSTS!!
...that and dodging rainstorms.
Sorry I've been a bit lax getting to these. Worked Sunday and then monday had to go out to Cumberland on an art mission. We did, however, get a bit of work done before the monsoons hit.
The roofline of the boat is held in place by a series of kingposts supporting not only the roof stringers but also the midline of the loft.
Here's the forward kingpost set being laid out.
 Raising them was somewhat facilitated by getting more of the floor panels painted and in place, reducing the possibility of ....um....bouncing.
Here's the forward kingpost in place.


The warped wood continues to be a challenge. Assembling the aft kinpost set was a wrestling match.
 Twist-o-rama. See what I mean. But we finally screwed and glued it into submission.

Here's a long shot.

Next, the two center sets will go up, followed by the plywood gores that shape the Vardo roofline. Then the skin....but first, of course, we have to wait for the friggin' rain....bleah.
So today, in the interim, I'll be working on the galley counter, sink, and pump setup. Will post more on that later today. Stay dry, folks.
M
Sorry I've been a bit lax getting to these. Worked Sunday and then monday had to go out to Cumberland on an art mission. We did, however, get a bit of work done before the monsoons hit.
The roofline of the boat is held in place by a series of kingposts supporting not only the roof stringers but also the midline of the loft.
Here's the forward kingpost set being laid out.
Here's the forward kingpost in place.
The warped wood continues to be a challenge. Assembling the aft kinpost set was a wrestling match.
Here's a long shot.
Next, the two center sets will go up, followed by the plywood gores that shape the Vardo roofline. Then the skin....but first, of course, we have to wait for the friggin' rain....bleah.
So today, in the interim, I'll be working on the galley counter, sink, and pump setup. Will post more on that later today. Stay dry, folks.
M
Saturday, April 26, 2014
work work work
Well its the weekend, and Im at work for most of the time, so don't expect a lot of posts til monday, but do expect a lot of progress then.....
wow....long day.
more shortly
M
wow....long day.
more shortly
M
Friday, April 25, 2014
Walls up, ahead of the rains....
.....again. I'm so tired of dodging this bizarre weather.
Today we got the first wall up and braced into place, assembled the second, and got that up as well....

 The outer walls are very lightweight, really just frames for the exterior sheathing. The weight is all bourn by the kingposts fore and aft.
 I used clamps and a bit of wood to make sure the beams were in line where they met before glueing and stapling them into submission.
 View from starboard.
 And the second wall goes up.
And then, of course, we had to put everything away because it freaking threatened rain again.
sigh....
A note about wood: It sucks anymore. I hand picked these pieces, and they're still warped, bent, knotholed, splitting, and, in general, terrible.
We do with what we have.
M
Today we got the first wall up and braced into place, assembled the second, and got that up as well....
And then, of course, we had to put everything away because it freaking threatened rain again.
sigh....
A note about wood: It sucks anymore. I hand picked these pieces, and they're still warped, bent, knotholed, splitting, and, in general, terrible.
We do with what we have.
M
Thursday, April 24, 2014
Walls and Errors
Good day..not a great one, but a good one. Began with cutting the remaining wood for the port and starboard walls and laying them roughly out on the deck.
 I decided, given the warpage of the wood.....and this was the stuff I picked out, mind you....to use plywood corner blocks to fasten the thing together, knowing they would help pull things straight....yeah yeah, I know, its Theatre set construction, but I've done it for years and know it works.
 It also helps keep things relatively square.


So here's the first completed wall frame, still a bit floppy at this point. I should have both it and it's twin up and in place by the end of tomorrow.
As for now, It was a rather more trying day than expected. Hot bath, I think, and dinner.
BTW when I bought my toolbag (see earlier entries) it came with a pair of kneepads, which REALLY came in handy today. Yet another thing on my "you really need to have this' list for building.
More later
M
Of course, remember what I said this morning about constant changes of plan? I realized as I put this thing together that I really needed to add the bracing for the outer skin NOW, rather than after the walls were up, which entailed another trip to the lumberyard and another delay. And then when I did add them I discovered an error in measurement. Unfortunately, these are glued and stapled blocks.....
In cases such as these, while the glue is still wet.......
....one must be merciless...
So here's the first completed wall frame, still a bit floppy at this point. I should have both it and it's twin up and in place by the end of tomorrow.
As for now, It was a rather more trying day than expected. Hot bath, I think, and dinner.
BTW when I bought my toolbag (see earlier entries) it came with a pair of kneepads, which REALLY came in handy today. Yet another thing on my "you really need to have this' list for building.
More later
M
A Few Morning Notes....
....while I'm sitting here sipping my tea and working up the ambition to tie into wall building.
This has been quite a project, in some ways easier and in some much more difficult than I'd imagined. Here's some of what I've learned so far:
When you're building something new.....and I know this from the theatre as well.....the design is plastic. You'll make constant revisions and changes as you go along, and that's okay. You also may begin thinking you know how you'll build something only to discover your knowledge wasn't nearly detailed enough. For my part, I've gotten up in the middle of the night countless times to sketch and re-sketch parts of the boat. That's not failure, that's progress, and you should be prepared for it.
A few minor things have made a huge difference in what has been, up to now, largely a one man build:
1) get some decent freaking shoes. I spent the first few weeks of this thing with my back killing me because I was wearing shoes I considered expendable to the workesite. I finally gave up on them, bit the bullet, got some decent Doc Martin's, and the pain went away even though the workload increased.
2) a pair of mechanic's gloves will save your hands a lot of battering. These are lightweight leather, intended to protect against splinters and abrasion but still supple. Most big box lumber stores carry them. My hands have already taken a beating from previous injuries and (once I got the splint off at the beginning of this build) the gloves have really helped.
3) a decent toolbag for your power tools will make ending the day ever so much more pleasant, especially if you have to go to and from an unsecured worksite. My day used to begin and end with numerous trips to and fro, carrying drills, bits, cords, saws, rulers........at the end of the day it was freaking agony as I was more than ready to be done, sit down, have a glass of wine and about nine aspirin (just kidding about there only being one glass of wine...oh, I mean about all that aspirin). I destroyed a half dozen supermarket bags trying to use them to haul stuff. More trouble than it was worth. Then I saw a heavy canvas bag on sale while I was shopping for lumber. Now I make one trip down, one trip up at the end of the day. Nuff said.
4) this is gonna sound dumb, but work when you're ready to work. Mornings are not my thing. I wake up slowly and vaguely confused and have since childhood. Tearing into work on a project like this when you're not awake will leave you frustrated, exhausted, angry, and possibly injured (bosses take note). Get up, wake up, have a decent breakfast. Work when it's time. Quit when it's time. If you listen to your body, you'll know.
So today I begin framing the walls. I'll post pictures this evening, so stop by. I'm thinking, looking at weather, that it's walls and framing this week, I work my job over the weekend, then the roof membrane and sides go on and the boat will be enclosed and boatlike.
stay tuned
M
Wednesday, April 23, 2014
A Chilly and Blustery day
...which began with me hiking up to the lumber store to rent their truck and carry home the stuff I purchased yesterday. Quite a load, really, and one of the last wood runs we'll have to make for this project.


Quite a bit of lumber, actually.
This load comprises the walls, the second deck and the roof supports. I spent most of the rather cold, windy afternoon cutting the lumber for the sides of the deck house.
And, no, this is not a giant sized game of pick up sticks destined for Burning Man....although that idea does have some appeal....hmmm
It is, in point of fact, all the lumber cut for the side framing, laid out in very very roughly the places they'll wind up then I start to assemble the walls.
So by about 4 in the afternoon, I and my back had had it, the wood was pretty much all measured and cut, and it was time for a break.
In the interim, a bunch of things we'd ordered showed up, including an anchor, the depth finder, the horn, a throwing float, a fire extinguisher..........
One of the reasons I'm so keen to get the deck house enclosed is that it'll give me a PLACE to put all this stuff. Really. I can't move in here anymore.
So there you have the day's work. Tomorrow, the first of the wall frames should go up and into place. Stay tuned.
Tuesday, April 22, 2014
sigh....rain rain rain
Today was somewhat disrupted. I did manage to get to my local big box hardware store (and my part time employer) and buy about 80% of the remaining wood we'll need for the project. Ill rent their truck and pick that up tomorrow AM. Also tomorrow, I may actually have some help, which would be nice.
Box lumber stores like Lowes and Home Depot often rent trucks for a very low hourly fee ( $20 or so for 90 min) which can make your life a LOT easier in these projects. Keep that in mind.
As for today, I've spent it doing sketches and figuring out sequences of build for the next couple of days. We have about a month to finish the boat and get it to the water.
eek
Hi to all you folks from The Steampunk Empire and Shantyboat Living. Glad to have you visiting. I've opened the comments section to everyone (takes about a day for them to post tho) so please give us your thoughts and ideas.
M
Monday, April 21, 2014
THE DECK IS IN PLACE!!
Happy with today, despite a disrupted start dealing with things that have nothing to do with the boat.
YAY! This thing is looking more and more...um...boatish. Glued and stapled in the last panels of the deck today.


The panels are cut for the center opening, but will have to wait until I get the wiring in place. There will also be two opening hatches (for winter fishing, sweeping, escape in case of pirates, etc etc.) fore and aft, which will be framed in manana.
Okay, I'm happy. We're back on schedule despite my hand, the weather, and a buncha other stuff.
Today we also received two really amazing lanterns from W.T. Kirkman, heavy galvanized steel cold blast lanterns with hoods, about 15-20 candlepower each, potentially 1200 btu or so, and 27 hours of burn time on a fill. These will live on the front deck in summer and indoors in winter. I was really impressed with the quality, and the great customer service we got from these guys. You can check them out at www.lanternnet.com. They also sell Dietz lanterns, Aladdin lanterns (which are as bright as a 50 watt incandescent bulb) and more. Good people to know if you're going off grid.

So tomorrow, we get rain (again) in the afternoon. Ill spend the morning fetching our very last wood order to finish the deck house.
....soon, friends....soon....
BTW I fixed the glitch in the comments section to make it easier for everybody to post comments. Don't have to login to do so. Please let us know what you think.
Oh and many thanks to Brian Lowe at Shantyboatliving.com for telling folks about us. I love this community sometimes. :)
M
Saturday, April 19, 2014
this weekend
Hey,
This weekend, I'm gonna be killing my back and destroying my arches working at a big box store. Not a lot of progress will be happening on the boat....sorry bout that. We did just order the life vests, horn, fire extinguisher, throwing ring, anchor, anchor line, depth finder, chartplotter, and a buncha other stuff, so that's progress in a way, I suppose. More posts monday when I can stick in some pix of things happening. ''
M
Friday, April 18, 2014
DECKING!!
This thing is finally starting to look boat-like....okay, raft-like
This afternoon, after tightening all the strapping on our barrels, we actually began working on the deck, moving the panels into, glueing, and stapling them with 1" galv. staples.
 Sigh...some of this stuff is a wee bit warped, but we coaxed it into place.
 At least things proved to be square enough to make this work.
 An air stapler makes quick work of stuff like this, fixing the panels before they can shift and WAAAY faster than screws would have been. I can see that this toy will also come in major handy when we start siding the deckhouse, and, yes, my pants ARE falling down in this shot. Too damn much stuff in the pockets, as usual.
 Note to self, be VERY careful to whom you give access to airtools......actually, she did quite well.
 Here's the first several panels in place. Its amazing how the frame stiffens with just these few tacked down.
So to recap: 1) if you do this kind of project, get yourself a bottle jack to help keep things level and move stuff into place and 2) the air stapler is one of the best purchases we made for putting this thing together.
More later, kiddies. I'm off to work. I'm hoping to get the remainder of the deck planks in during my limited free time this weekend (working again) and can begin actually raising the deck house come monday.
Stay tuned. Love to hear your comments.
M
This afternoon, after tightening all the strapping on our barrels, we actually began working on the deck, moving the panels into, glueing, and stapling them with 1" galv. staples.
So to recap: 1) if you do this kind of project, get yourself a bottle jack to help keep things level and move stuff into place and 2) the air stapler is one of the best purchases we made for putting this thing together.
More later, kiddies. I'm off to work. I'm hoping to get the remainder of the deck planks in during my limited free time this weekend (working again) and can begin actually raising the deck house come monday.
Stay tuned. Love to hear your comments.
M
A quick note on this morning's work...
OMFG go get yourself one of these little hydraulic bottle jacks!!!! We're kicking ourselves.

We realized we needed to tighten up the ties on one of the barrels and used the little jack to lift the thing into place. You'll recall we'd spent an exhausting day putting them all in. With this little thing, it went so quickly, we retied and tightened all 18 of them in about an hour, with a minimum of cursing, sweat, grief, busted knuckles, and exhaustion.
.......this message brought to you by the amazing cheap little blue jack association......
Thursday, April 17, 2014
How is it that I'm still moving.....?
Wow. Productive but utterly exhausting day.
Today we completed all the centerline supports for the floor.
 ...as well as the paddlewheel well
 ...finished the foredeck reinforcing, snugged up the pipe fittings, and tightened the webbing securing the barrels. Here you can see how the pocket drill works to attach stringers.
 ...oh did I mention we painted two coats of exterior latex on ALL the floor panels for the entire first deck of the boat? They're currently scattered all around the yard like discarded dominos, drying.

 Then we all went inside and ate everything in the fridge. Actually that's not fair, I grilled some large and entirely appreciated burgers, we destroyed a number of potatoes in potato salad, and thoroughly killed a rather large amount of Australian Shiraz.
Tomorrow will be telling. Tomorrow we'll attach the flooring (save the center strip that will house wiring, etc.) to the deck. Wish us luck.
Today we completed all the centerline supports for the floor.
Tomorrow will be telling. Tomorrow we'll attach the flooring (save the center strip that will house wiring, etc.) to the deck. Wish us luck.
Wednesday, April 16, 2014
yet more progress....YAY
...albeit slower than we wanted. The weather is somewhat flummoxing us again. This AM was far too cold to paint latex paints....not just that it was chilly, but the Paint won't work under about 48 degrees.
Ah well, . So we did a bit of maint. on the frame, moving some of the piers so work would be easier.
 I finally gave up and dropped $20 on a cheap two ton bottle jack. Suddenly difficult things became easy. If you do one of these projects for godssake go get one. They'll effortlessly lift the frame so supports can be added, altered, or moved. I really wish I'd started with one.
Early this AM we moved some of the piers to make construction easier, repaired two of the others, picked up some additional paint supplies and a bit more webbing (we ran out on nylon military surplus web strapping on the last barrel, would you believe?), and more screws.
We strapped on the last two barrels and started with the stringers that will hold the inboard side of the floor.

To make these work we used the pocket hole tool so we could mount them inline. I've really come to appreciate this little thing.

At the same time, we started painting the precut plywood for the floor with two good coats of barn and fence paint.


So the stringers to support the inboard side of the flooring proceeded across the boat......
the only problem I discovered was that, with the barrels in place, the only way into the frame is crawling in from the ends. Once you're in the middle, you're in the middle if you get my drift.

So remember your stuff the FIRST trip inside the frame. Otherwise its one trip crawling out after another to remember screws, your pencil, the speedsquare, your water bottle.....
you get the idea....

The floor panels are ready and drying and the stringers ready to support them. Our floor is a stressed skin structure, only 1/2" thick plywood, glued and stapled around the edges to form a firm floor, rather like a drumskin.....we hope. Works on stage sets, anyhow.

So more red barn paint, more sealing, more glue, all ready to start coming together tomorrow, provided we don't have snow, locusts, napalm storms, the iceCapades, or monsoons. Lordie am I tired of this weirdly random weather .
Tomorrow, actually, is supposed to be nice, so hopefully more headway. For tonight, its a hot bath and dinner with friends.
Thanks to everyone who left comments and who is following our blog. We hope to keep it worth your while. Please let us know if we've left anything out or if you'd like more information on any of the construction.
M
Ah well, . So we did a bit of maint. on the frame, moving some of the piers so work would be easier.
Early this AM we moved some of the piers to make construction easier, repaired two of the others, picked up some additional paint supplies and a bit more webbing (we ran out on nylon military surplus web strapping on the last barrel, would you believe?), and more screws.
We strapped on the last two barrels and started with the stringers that will hold the inboard side of the floor.
To make these work we used the pocket hole tool so we could mount them inline. I've really come to appreciate this little thing.
At the same time, we started painting the precut plywood for the floor with two good coats of barn and fence paint.
So the stringers to support the inboard side of the flooring proceeded across the boat......
the only problem I discovered was that, with the barrels in place, the only way into the frame is crawling in from the ends. Once you're in the middle, you're in the middle if you get my drift.
So remember your stuff the FIRST trip inside the frame. Otherwise its one trip crawling out after another to remember screws, your pencil, the speedsquare, your water bottle.....
you get the idea....
The floor panels are ready and drying and the stringers ready to support them. Our floor is a stressed skin structure, only 1/2" thick plywood, glued and stapled around the edges to form a firm floor, rather like a drumskin.....we hope. Works on stage sets, anyhow.
So more red barn paint, more sealing, more glue, all ready to start coming together tomorrow, provided we don't have snow, locusts, napalm storms, the iceCapades, or monsoons. Lordie am I tired of this weirdly random weather .
Tomorrow, actually, is supposed to be nice, so hopefully more headway. For tonight, its a hot bath and dinner with friends.
Thanks to everyone who left comments and who is following our blog. We hope to keep it worth your while. Please let us know if we've left anything out or if you'd like more information on any of the construction.
M
Tuesday, April 15, 2014
quick note
After a full day of rain (we spent it packing and scheming) there has been very little in the way of stretching or settling in the barrels. The nylon webbing (military surplus) we used seems immune to that. Tomorrow, we begin to address the deck and superstructure.
Monday, April 14, 2014
...barrel, barrel, ow, ow, ow, barrel, barrel......
Ugh. Lots of progress today, but we're paying for it physically, I can tell ya.....
On a cloudy and blustery day we ventured to our local Lowes, got the remaining pipe....that I forgot....and the plywood for the deck, and tied into building same.
Since so much of this construction is experimental, we're constantly rethinking things. I'd intended to use this really very clever scheme using stainless steel rings and 600 lb test nylon webbing to hold the barrels in place.
....didn't work. We wound up tying them, which will be inelegant, but fine.
So here's the method:
First, you start with your pet barrel. It's my pet barrel because it followed me down to the worksite....and very nearly into the alley, across a parking lot and into the side of a lurking Police car, but I digress.
We basically used a twisted rope--a "Spanish windlass"--to pull the barrels up into place. Since our frame is elevated and upright, we can't just tie them on as you could if building inverted or on the ground.
It took us a bit to hit on what method we were using to jack up and attach these. We finally wound up levering them into place from below with a couple of sticks, cinching them off with sash cord, and then tying them in two places with the webbing.
Here's the first row finished. Please note, you are NOT going to get these snugged tight. They'll hang moderately close to the pipes with a bit of slack between. That's okay. Water pressure will snug them up into their places once you get them wet. The challenge is getting them to the water in place.
Here's both ranks in place. This was FAR more strenuous and time consuming than we'd anticipated.
BUT it's done! The two front floats will have to wait until I can move the support piers....they're in the way...but we'll get the stuff for the new supports tomorrow and put them in Wednesday. Tomorrow, they're predicting another full day of rain, and it'll be interesting to see how much stretching or contraction the straps go through. Regardless, this was one more huge hurdle we had to get past. Wednesday, we'll paint and deck the hull (more on that later) and begin erecting the walls.
I'm pleased, I'm sore. stay tuned.
We'd love to get your comments (though you will have to have a wordpress or gmail account to sign in). Please let us know what you think.
Subscribe to:
Posts (Atom)